Introduction
That summer after the gaokao, China’s university entrance exam, I skipped the celebrations and plunged into the world of code. After two months of exploring algorithms and data structures, I wanted to record the experience and give that effort a visible trace. To do this, I turned to GitHub. My plan was to build a personal homepage that was uniquely mine and could dynamically show the course of my learning.
I learned that a regular git push would timestamp all the commits with the current time, leaving the GitHub contribution graph unable to faithfully and precisely reconstruct my learning over the summer.
To solve this problem, and to create a traceable, visual record of my future learning, I designed and carried out this manual migration and reconstruction of the version history.
This post records the entire process and what went through my mind along the way, from struggling to type Git commands correctly to finally automating the work with Python scripts.
Doing It Manually: The Basic Workflow and Troubleshooting
I decided to use git commit to create a commit with a historical timestamp for each solution file. This approach was workable, but while carrying it out manually, I encountered and resolved a series of typical command-line and Git configuration issues. Here is a review of them.
The Core Approach
The technical foundation was the --date option provided by Git’s commit command. It lets users specify a custom timestamp when creating a commit, making it possible to build a version history retrospectively.
The basic workflow I designed was as follows:
Add the code file to the working directory.
Manually add a standardized comment header in the first four lines of the file, in this format:
// Problem: 练习平台 题号 题目
// Link: 题目链接
// Author: nine19een
// Date: 日期
//
// 代码正文The Chinese placeholders mean, in order: practice platform, problem ID and title; problem URL; date; and the code itself.
Use
git addto put the file changes in the staging area.Run
git commitwith the specific historical date to create the commit.
An example of the core command:
git commit --date="YYYY-MM-DD HH:MM:SS" -m "Creat 文件名"
Here, --date specifies the historical timestamp. I could get it from the submission history on the practice platform and manually substitute it into the command.
Configuration and Troubleshooting
While putting this workflow into practice, I encountered and resolved the following typical configuration and command-line issues.
Case 1: Navigating to the Wrong Path — No such file or directory
What happened:
In Git Bash, usingcdwith a standard path copied from Windows File Explorer failed to change directories and returnedNo such file or directory.Analysis:
This error came from the different path notations used by Windows and Unix-like environments such as Git Bash. There were two main points:- Path separators: Windows uses
\, whereas Git Bash needs/. So copying a path directly from Windows File Explorer and pasting it into Git Bash does not work! - A complete path: The path structure must be complete and correct, starting from the drive letter.
- Path separators: Windows uses
Solution:
Fix the format: If copying and pasting the path, manually replace every
\with/and make sure the path is complete, for example,C:/Users/YourName/Documents/....Use the GUI to help: A more efficient, less error-prone approach is to type
cdand then drag the target folder from File Explorer straight into Git Bash. This automatically produces a complete path in the correct syntax. I strongly recommend this approach; it is harder to get wrong.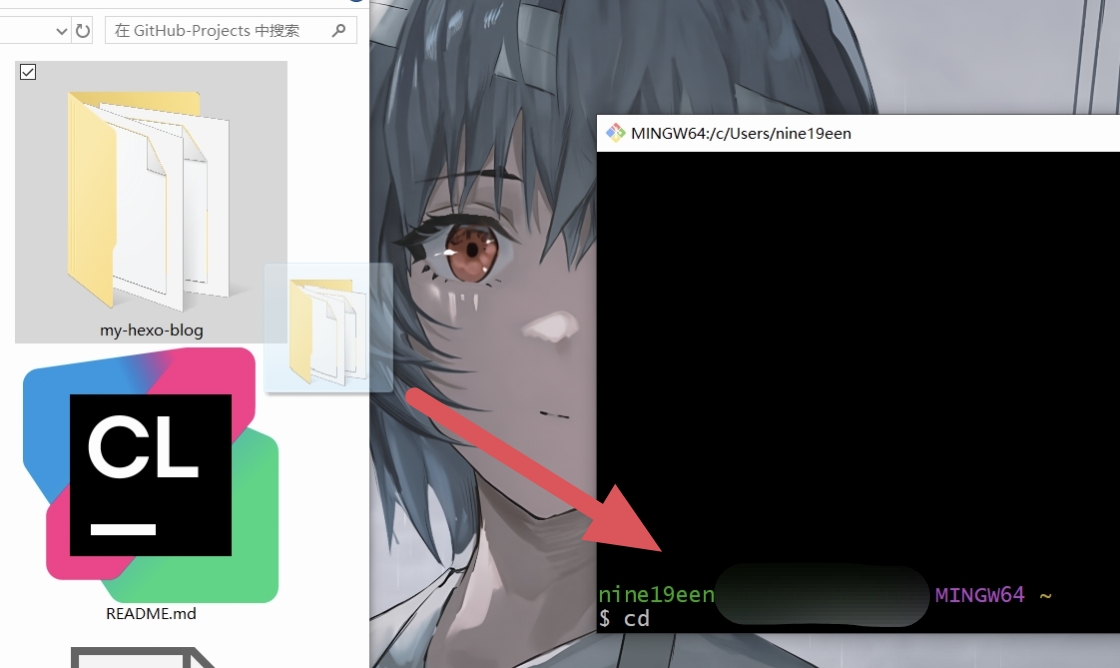
Dragging the file into Git Bash automatically generates its full path.

Then just press Enter.
Case 2: Being Outside the Repository — fatal: not a git repository
What happened:
After successfully runninggit clone, I ran commands such asgit statusorgit addin the current directory—the directory where I had runclone. Git returned a fatal error saying that the current directory was not a Git repository.Analysis:
git clonecreates a new subdirectory in the current directory as the repository root. All Git operations must run inside this new directory or one of its descendants, because the root contains the required.gitmetadata folder. When the error occurred, I was in the repository’s parent directory.Solution:
Aftergit clone, usecd <repository-name>to enter the root of the newly cloned repository before carrying out any further Git operations.
Case 3: A Failed Network Connection — schannel: failed to receive handshake, SSL/TLS connection failed
What happened:
After sorting out the local paths and repository location, I ran into the most difficult blocker. Any network operation that needed to communicate with the remote server, such asgit push,git pull, orgit fetch, would fail after a long wait and return this low-level network error:schannel: failed to receive handshake, SSL/TLS connection failed.The most confusing part was that, at the same time, my browser could open
github.comquickly and without any trouble.Analysis:
“It works in the browser but not on the command line” is a very typical symptom of a proxy configuration issue.The root of the problem was that I was running a proxy tool such as Clash on my computer to improve network access. My browser was correctly configured to access GitHub through the proxy, so its connection was smooth. Git Bash, however, is a separate command-line environment and does not automatically use the system proxy settings by default.
As a result, Git was still trying to connect directly to GitHub’s servers. My network environment interfered with that direct route, causing a timeout during the SSL/TLS handshake.
schannelis the name of the built-in Windows security library that handles this process.Solution:
The key was to manually configure the Git command-line tool to use the same proxy server as the system.This took two steps:
Find the proxy port:
First, find the local port on which Clash listens for HTTP/HTTPS traffic. Here I use my own setup, Clash Verge, as an example.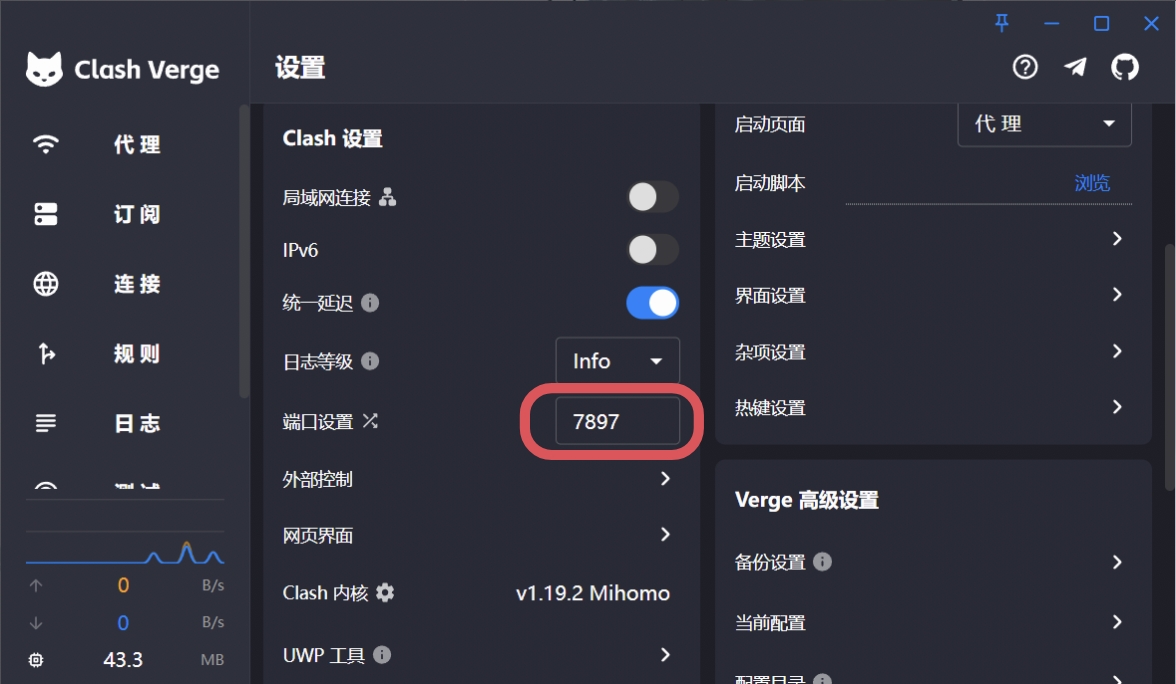
Screenshot guide: “设置” means Settings, and “端口设置” means Port Settings. The circled port in this example is
7897.Configure Git’s global proxy:
Next, run the following two commands in Git Bash, pointing bothhttp.proxyandhttps.proxyat the local proxy’s listening address (http://127.0.0.1:端口号). P.S.127.0.0.1is a special IP address that always refers to your own machine. In these commands,端口号is the port-number placeholder.Point Git’s HTTP traffic at the local port:
git config --global http.proxy http://127.0.0.1:端口号Point Git’s HTTPS traffic at the local port too (the crucial part):
git config --global https.proxy http://127.0.0.1:端口号
After running these two commands and successfully “turning on the proxy” for Git, I ran git fetch again, and the connection problem was resolved.
Case 4: A Rejected Push — ! [rejected] main -> main (fetch first)
What happened:
After making a localcommit, I rangit push, but the remote server rejected it. The message said that the remote repository contained changes that were missing locally.Analysis:
This is a Git safeguard intended to prevent a local push from accidentally overwriting commits made by someone else—or by me elsewhere—on the remote repository. It commonly happens when a newcommithas been made remotely since the localcloneor most recentpull, for example, editingREADME.mddirectly on the GitHub website.Solution:
Always rungit pullbefore everygit push, so the local and remote repository files stay synchronized.- Run
git pullto download the latest remote changes and merge them automatically. - Resolve any merge conflicts that arise (for a personal project, the automatic merge will usually succeed), then run
git pushagain.
- Run
Case 5: A Line-Ending Warning — LF will be replaced by CRLF
What happened:
When usinggit addon a file, Git Bash displayed a warning that the file’sLFline endings would be replaced withCRLF.Analysis:
This happens because operating systems use different line-ending conventions. Unix/Linux/macOS useLF, while Windows usesCRLF. Git’s built-incore.autocrlffeature can automatically convert between them to keep line endings consistent in the repository. The warning is a sign that this feature is at work.Solution:
Ignore the risk and continue (heh). No action is needed; the warning can safely be ignored. This is normal Git behavior, meaning that it is handling cross-platform compatibility for us in the background.
Case 6: Managing the Staging Area — Undoing an Accidental git add
What happened:
After runninggit add ., I noticed that I had staged some unnecessary files or incorrect changes and needed to undo that before making acommit.Analysis:
This is a very common need in a Git workflow: a command that safely moves files out of the staging area and back to the working directory without losing any code changes.Solution:
Unstage everything:
git resetclears the entire staging area in one go.git resetUnstage one file:
git restore --staged <file>removes a specific file from the staging area.git restore --staged <filename>
Neither approach changes the contents of files in the working directory, so both are very safe.
Automating It: From Manual Labor to Building a System
After four hours of manually migrating historical commits, I immediately realized that creating and maintaining a table for these hundred-plus solution files in README.md—with a consistent format, accurate information, and date ordering—would be extremely time-consuming and error-prone. be the death of me.
So I decided to write Python scripts to automate the entire README.md update process. P.S. Laziness is humanity’s greatest productive force.
The Core Approach: Two Stages
To reduce complexity and keep each step stable and reliable, I split the automation task into two separate but sequentially related projects:
Project One: Standardizing Source-Code Comments
Goal: Traverse all the source files and update any whose comments do not follow the standard. For the format, see Doing It Manually: The Basic Workflow and Troubleshooting → The Core Approach → Step 2.
Purpose: Provide the later
READMEgenerator with a consistent, reliable data source that can be parsed offline.
Project Two: A README Generator
Goal: Read all the standardized source files, extract the metadata from their header comments, and generate the complete final Markdown table containing every problem and solution for
README.md.Purpose: Completely replace the work of manually editing the
README.
Project One: The Source-Comment Standardization Script
Case 1: Inconsistent Encodings — Garbled Chinese Text
What happened:
When my script tried to read.cppfiles, or when I opened files cloned from GitHub in CLion, their Chinese comments appeared as garbled text.Analysis:
This was a typical character-encoding mismatch. GitHub and CLion useUTF-8by default, which supports languages from around the world. The Dev-C++ I had previously used for practice on Windows, however, saved files in the localGBKencoding by default. When a program tries to read aGBKfile asUTF-8, the text becomes garbled.Solution:
EnforceUTF-8throughout the development chain.Migrate the development environment: Stop using the old IDE with poor
UTF-8support and move my main development work to the modern,UTF-8-by-default CLion.Specify encodings in the script: Explicitly set the
encodingargument whenever using Python’sopen(). Useencoding='utf-8-sig'for reading to support UTF-8 files with a BOM on Windows, andencoding='utf-8'for writing.1
2
3
4
5
6
7# 读取时指定编码
with open(file_path, 'r', encoding='utf-8-sig') as f:
lines = f.readlines()
# 写入时同样指定编码
with open(file_path, 'w', encoding='utf-8') as f:
f.writelines(lines)
The Final Script: update_sources.py
The script’s core logic is to traverse every C++ file in the specified directory and check whether it already has a standard header. If it does not, the script parses the problem ID from its filename, requests the problem URL to retrieve the full title, and gets the date of the file’s first commit from Git history. It then combines this metadata into a standard comment block and writes it back to the start of the file.
Once I had explained my requirements thoroughly to Gemini, a Python script for automatically updating the comments was born.
Expand/collapse the complete `update_sources.py` code
1 | import os |
Project Two: The README Generator Script
Once every source file had standardized metadata, generating the README became a straightforward task.
Case 1: The Scraper Stopped Working
What happened:
While developingupdate_sources.py, the scraper function for retrieving Luogu problem difficulties kept failing despite repeated attempts. It returnedN/Aor empty page content even though the URLs opened normally in the browser.Analysis:
I wrote a separate script to save the raw HTML returned byrequestsand found that I was receiving a Cloudflare human-verification page rather than the Luogu problem page. My requests had probably been identified and blocked by Cloudflare’s anti-scraping mechanism.Solution:
- Iterating on the approach: I tried several scraping strategies: changing the User-Agent, looking for specific HTML tags (Luogu’s difficulty labels use
<span>), and even using regular expressions to match data scripts directly in the page. All failed because of the anti-scraping mechanism. - The final approach: It suddenly occurred to me that I could save the problems and their difficulties locally straight from my Luogu profile, turning them into static data.
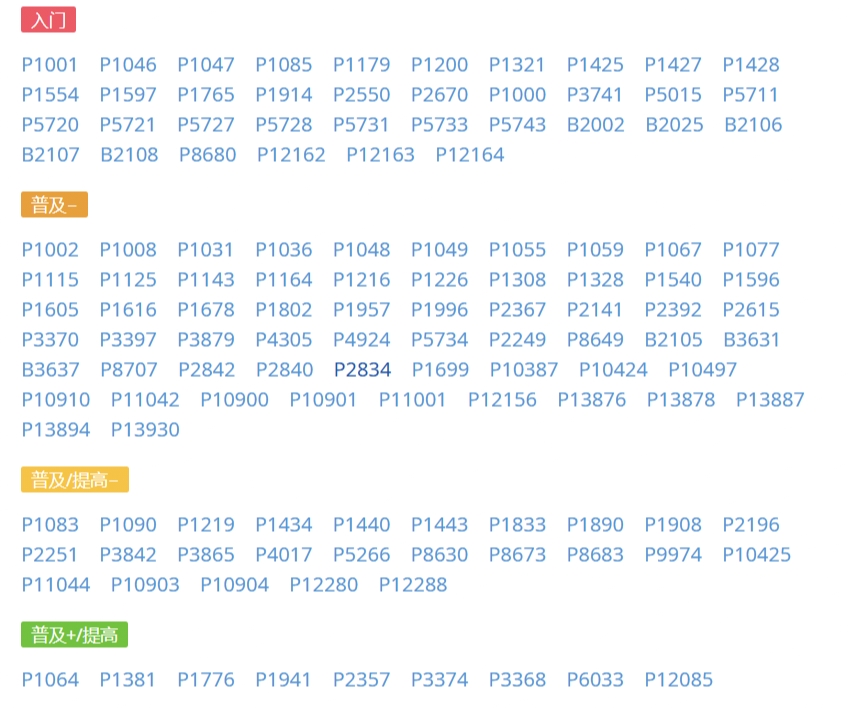
Difficulty-label guide: “入门” = Beginner; “普及−” = Basic−; “普及/提高−” = Basic/Intermediate−; “普及+/提高” = Basic+/Intermediate. These are the Luogu labels shown in the screenshot.
I therefore made a key architectural decision: give up dynamic scraping and switch to a static local data source.
I manually organized the difficulty information for every problem into a Python dictionary and built it directly into the script.
1
2
3
4
5
6# 本地难度数据库示例
DIFFICULTY_DATA = {
"P1001": "入门",
"P1002": "普及−",
# ... and so on
}This decision freed the script from Cloudflare entirely, making it 100% reliable and extremely fast, as well as easy to maintain in the long term.
- Iterating on the approach: I tried several scraping strategies: changing the User-Agent, looking for specific HTML tags (Luogu’s difficulty labels use
Case 2: An Oversight in the Logic
What happened:
The first version successfully generated table rows for all the new problems. During later iterations, however, I found that it dropped existing records from platforms other than Luogu, such as Codeforces, inREADME.md.Analysis:
My script only considered “generating the new,” without considering “keeping the old” or “merging and sorting.”Solution:
Refactor the core logic to support multiple platforms:- Read everything: When reading the old
README, load every table row into memory rather than filtering for Luogu problems alone. - Process incrementally: Generate new table rows only for files whose filenames do not appear in the existing records.
- Merge and sort: Combine the new rows and all the existing rows into a single list, then sort the whole list by date in descending order.
- Read everything: When reading the old
The Final Script: generate_readme.py
This is the final version after multiple refactorings and bug fixes. It combines the local difficulty database, support for multiple platforms, incremental updates, and sorting of the full dataset.
Running it produces an update.txt file containing the final, perfectly sorted table of old and new problems. All I need to do is copy it in full and replace the old table in README.md.
Expand/collapse the complete `update_sources.py` code
1 | import os |
The Final Result
After all that manual migration, automation-script building, and README.md generation, my GitHub Profile finally became a dynamically updated, information-rich personal technical record.
It now contains both a contribution graph that faithfully reflects when I studied and a detailed, consistently formatted practice log that I can keep updating with automation scripts.

Screenshot guide: The practice table lists dates, problems, difficulty badges, and C++ solution links. Its Chinese difficulty badges use the same labels explained above.
This Profile will faithfully record every step I take through my four years at university.
Come visit my ➡️ GitHub profile ⬅️ for the latest progress and project source code. Advice from more experienced developers is always welcome~